


Hi y'all!! First, I just want to say I am SO, SO sorry these pictures aren't that great. It has been an absolutely insane week, and today we have so much stuff going on that I didn't have time to take great pictures, but I wanted to get this "how-to" up on my blog. I had to make a choice...blog about nothing, or get something off my to-do list (that I've been meaning to do for several weeks!). I'm very sorry! But I promise, I will take better photos once it's all quilted.
This quilt was inspired by (I bet you can't guess) Texas!! My mom will be visiting from Texas in the summer and I got the crazy idea to make a Texas quilt to hang on my wall--to show her how much I missed home, I guess. This quilt is not exactly original--after a google image search, I came across this quilt, and wanted to make one of my own. I don't have permission to use the original image so I'm going to show you how I broke it down with my quilt. I stared at that original image for a long time to try to figure out how to make it and this is what I came up with.
To do the same thing I did, you'll need to print the image of the Texas quilt above or use the pattern at the very bottom of the tutorial.
I noticed that Texas could be divided into 4 quadrants so I drew lines to section it off. Then I just worked on one quadrant at a time.

For this "how-to" I'll be showing you with the top-left quadrant.

I noticed that the quilt in the original photo wasn't as random as I originally thought, and it could be divided into distinct rectangle blocks in each section. So I just drew out the sections (rectangles) into sizes I thought were manageable (see pic below). I hope this is making sense.

After that, I just made one block at a time and this is how I did it..
(let's take a closer look at the block below with the arrow)

Here is a close-up of the block:
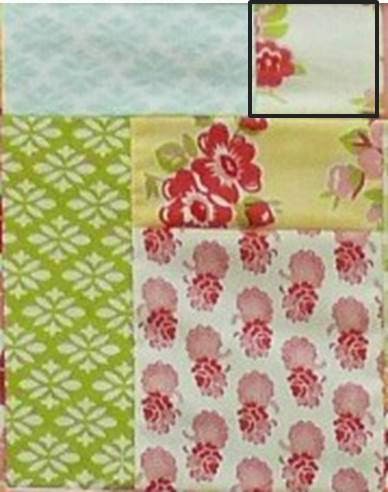
I knew from looking at the original image that if you looked at the tiniest square in the rectangle, you can use that as a basis for how big each section/block should be. I decided my smallest square would be 2.5".
If you took that square and used it as a basis for a grid, each block could be made of multiples of the 2.5" square.

I used mind's eye to see how many 2.5" squares it would be across and down.
As you can see above, it's 3 squares across and 4 down.
Take a look again without the lines...can you see it's 3 x 4 by just using the small block in the upper right corner as your basic building block?

I then just used quilting multiplication to make a block made up of multiples of 2.5" that equaled 3 "squares" across and 4 down. After I knew that, it was mostly improvised patchwork.

After I got the hang of it, it went really fast. I sewed the blocks together as I made them (so I didn't have blocks lying all over the place that I had to worry about labeling) and I was able to complete a quadrant in the matter of a couple of hours.
When I got to the sections on the edges of Texas with the white, I just incorporated the white into my blocks.
You can see how it is broken down here (this is the bottom left side of the quilt):

For the larger sections of white space I used the same method. I would just imagine the grid on the picture again, and count how many 2.5" squares across and down to cut my large white pieces (notice them in the pic below).
To assemble the quilt, I sewed two quadrants together to make a half, did the same thing to the other side, and sewed the two halves together. I added a 3" white border around all sides of my quilt.
This quilt finishes at around 68.5" x 67"

I created the image below in the Threadbias design tool to help you if you don't want to use the pic above.
And if you are uncomfortable with the math, the most common size blocks I used in the quilt were
2.5" squares
2.5" x 4.5" rectangles
4.5" squares
2.5" x 6.5" rectangles
4.5" x 6.5" rectangles

I hope that this tutorial inspires you to make your own Texas quilt, and please, please, don't be intimidated to try it. It's a lot easier than I probably made it out to be, and it's actually a lot of fun because you can make each section as easy or as hard as you want, depending on what size blocks you use. It would go super fast if you used a jelly roll or two. If you have any problems or need any help, please don't hesitate to comment or send me an email.
I hope you guys have a wonderful Easter!!!
I love this quilt. JS
ReplyDeleteThank you JS:)
DeleteAwesome! Pretty fabrics. The shape of my state is rather blah- Colorado is a rectangle...
ReplyDeleteBeing a native Texan in Texas, this quilt makes me happy! And would be a totally fun QAL,
ReplyDeleteI really should make one of these for my brother's family. Great job! Can't wait to see it hanging on your wall. I just need to figure out an Idaho one!
ReplyDeleteAnother great creation! Love that you made a tribute to your home! Happy Easter Cristina :)
ReplyDeleteHmmmm.... this is great inspiration! Thanks for sharing your secrets. Now I just need to apply them to New Hampshire :)
ReplyDeleteThis is awesome! Thanks so much for the tutorial!
ReplyDeleteLOVE! I am going to have to make one of these.
ReplyDeleteOh Dear... Michigan would be quite a challenge:). Love yours, though.
ReplyDeleteSharon
This is so awesome! Do you know how I could make it smaller? I'd love to do one for a wall hanging!
ReplyDeleteI am from TX, so this will have to be on my to do list!
ReplyDeleteOh, I love this, but I don't think I'd have the patience! I like Melanie's idea of a smaller version. I have a Texas family I'd like to send a mini version to!
ReplyDelete